To follow up on our portrait photography guide we now look at landscape photos and how to get the best shot. Landscape photos are ideas for calendars and canvas prints and using these tips you can really get a professional finish to your photos without spending a fortune on expensive equipment and services.
Recce your location where possible. Look for ideal angles and figure out where the sun will be and when. Prepare warm and maybe waterproof clothing. Take appropriate drink and food. Allow time to arrive and be set up for the moment you want to shoot.

Copyright: Porojnicu Stelian/Shutterstock
The sunrise in this image lasted only a few moments and was photographed at high altitude. Being ready, in place with the photographer and camera protected from the elements was vital for an image like this.
Shoot in the early morning and late evening (the "Golden Hours"). This light is soft and warm, preventing harsh contrast and washed out colours. Shadows are softer and more interesting. Moonlight on snow and city lights also offer night-time possibilities.
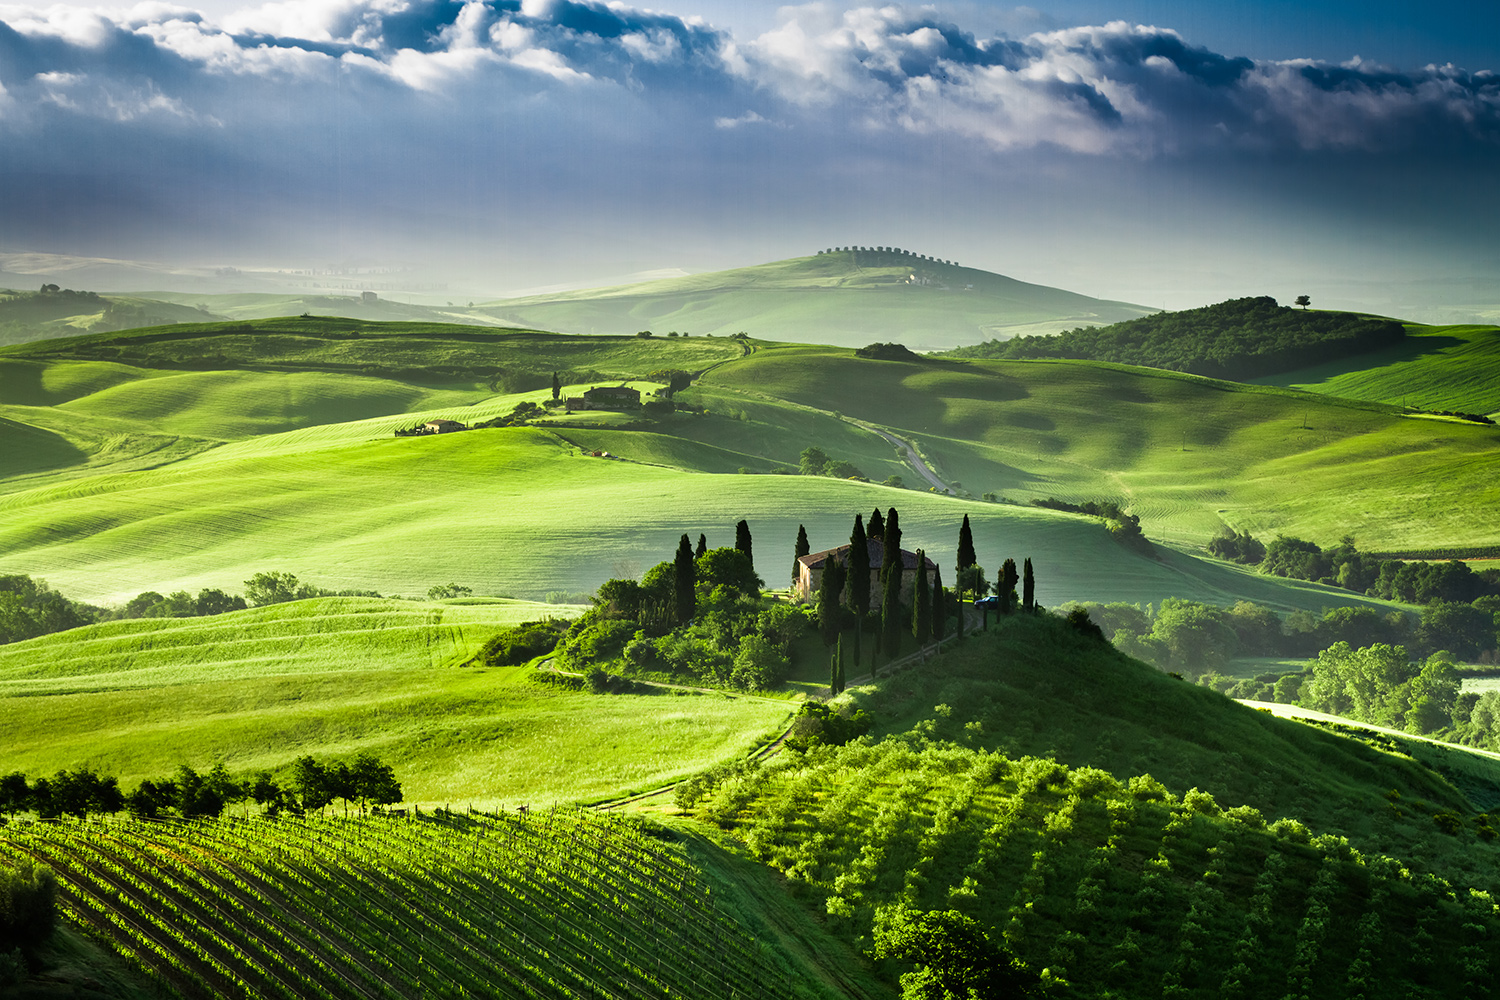
Copyright: Shaiith/Shutterstock
In this image the soft sunlight really enhances the vibrancy of the wonderful greens in the image. As the sun is low in the sky it casts long pale shadows that really emphasise the curves and features of the hillsides and crops.
Landscapes are traditionally sharp with lots of depth of field. Tripods minimize camera shake during the long exposures required. Turn off autofocus and image stabilizing. Use the timer or a remote shutter release to avoid pressing the shutter button. Select "Mirror Up" mode if your camera has it.

Copyright: Francesco Ferrarini/Shutterstock
In this image we can see fine detail all the way from the rocks in the foreground to the mountains in the background. Depth of field this great requires a small lens aperture (large "f" number), a slow shutter speed and a tripod to get it all this sharp.
Sometimes landscapes benefit from a point of interest, usually in or near the foreground. Trees and buildings are good examples. Try placing these off-centre, using the "Rule of Thirds" principle to create a more interesting image.

Copyright: 2630ben/Shutterstock
This tree provides a strong point of interest and occupies a key position in the left third of the shot. Its pose seems to start a narrative then the curve of the riverbank seems to pull us through the image from left to right.
Try using slow shutter speeds to allow elements in your landscape to move during your exposure. Long grass, crops or even animals can be good for this, along with water. Deliberate linear movements with the camera can also provide interesting blur.

Copyright: Owen Brown Photography
With the water frozen this picture was far less interesting. A really long shutter speed would have seen the waves disappear to an even mist. A speed of around 2 seconds allowed it to rush through the image but retain some feature, giving a sensation of something happening live.
Try to capture the sky with a few clouds for feature and depth. Use a UV filter to avoid haze, especially in the mountains. Try a polariser, graduated filter or photo software to get rich blues and definition. Prints from film can be "dodged and burned" in the darkroom.

Copyright: Owen Brown Photography
The colour of this cloud and its dramatic shape are evocative of Classical oil-painted skies. The near silhouette of the hills provides a base to anchor it and give it scale. A polariser ensured a strong blue sky and good definition of the cloud's delicate features.
Simple, empty landscapes can also be evocative. Use the Rule of Thirds principle and compose with the horizon above or below the centre line of the image, rather than right in the middle. If the sky is interesting, emphasise it and vice-versa.

Copyright: David M. Schrader/Shutterstock
This almost featureless seascape is nonetheless strong due to the simple arrangement of beautiful tones and calming colours. The emphasis is on the shimmering water and a little panning movement with the camera has given it an appropriately soft feel.
Once you have composed your picture, take a "bracket" of shots at different exposures. The best can be selected later and highlights and shadows adjusted. Two exposures can even be blended to show several elements properly exposed. Keep it subtle for traditional pictures or explore "High Dynamic Range" for otherworldly results.

Copyright: Neale Cousland/Shutterstock
Most cameras can't capture in one image the tonal range our eye sees. In a normal exposure of this image either some pink in the sky would be lost or the rocks would be too dark. By adjusting highlights and shadows or blending different exposures we can see detail in both rocks and sky.
If a Landscape is lacking interest, try framing it with objects at the edges of the image. These can be out of focus or dark and can help draw the eye to the centre. Applying a slight vignette in Photoshop or the darkroom can do the same.

Copyright: Owen Brown Photography
This island of trees look good in a wide sea of the snow covered field but the sky was rather boring. Stepping back into the trees gave a nice frame of interesting branches and undergrowth, masking some sky and drawing us into the centre of the image.

 Help
Help